Prove Wallet Ownership with Message Signing
Implement Sign-in with Cardano authentication using CIP-8 message signing and Mesh SDK.
Overview
Wallet ownership verification lets users prove they control a Cardano address by signing a message with their private key. This uses the CIP-8 message signing standard and the CIP-30 wallet interface. Together, these standards form the foundation for "Sign in with Cardano" authentication.
What you will build
- A nonce generation system for replay attack prevention
- Client-side message signing with CIP-8
- Server-side signature verification
Common use cases
- User authentication - Replace passwords with wallet-based sign-in
- Action authorization - Verify consent for off-chain operations
- Access control - Gate content to specific wallet holders
Prerequisites
- A Next.js application with Mesh SDK
- Basic understanding of authentication flows
Time to complete
30 minutes
How It Works
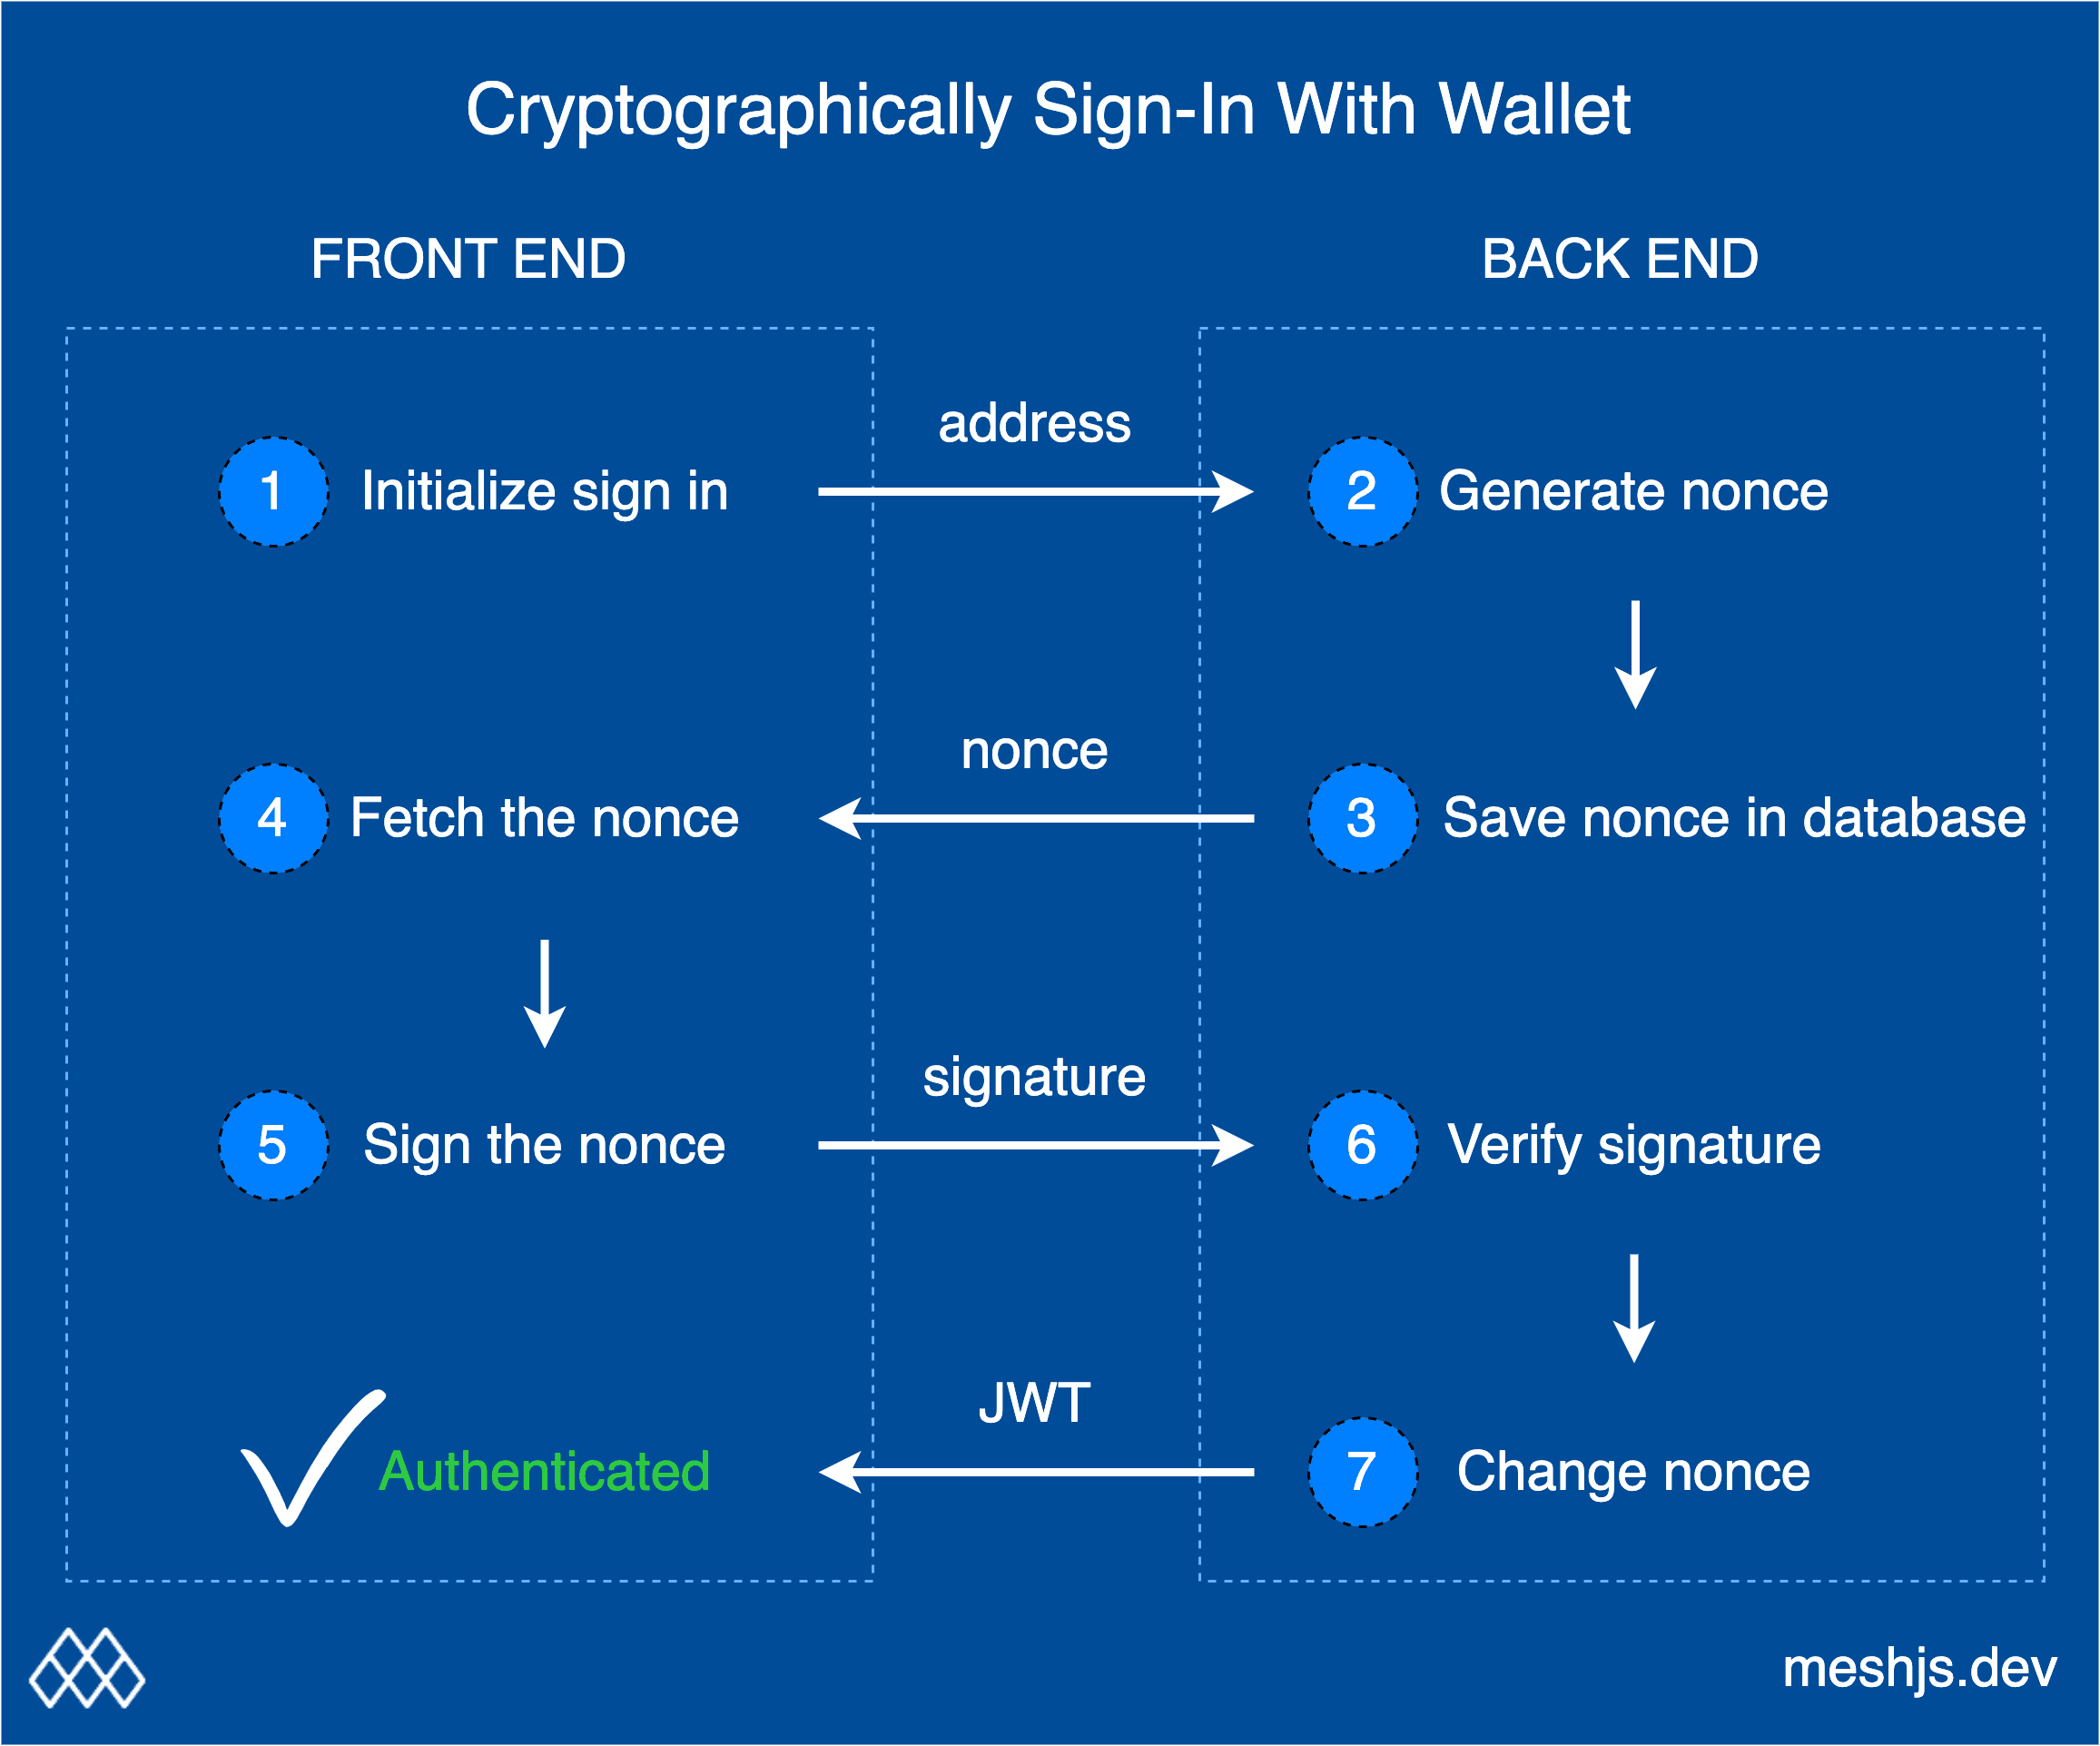
The authentication flow:
- User connects wallet and provides their address
- Server generates a unique nonce and stores it
- User signs the nonce with their private key
- Server verifies the signature matches the claimed address
- Server issues a session token (JWT, cookie, etc.)
The nonce prevents replay attacks - each authentication attempt requires a fresh signature.
Step-by-Step Guide
Step 1: Get the user address
Connect the wallet and get the user's address on the client:
// components/SignIn.tsx
"use client";

import { CardanoWallet, useWallet } from "@meshsdk/react";

export function SignIn() {
  const { wallet, connected } = useWallet();

  async function startLogin() {
    if (!connected) return;

    // Get the user's first used address
    const userAddress = (await wallet.getUsedAddresses())[0];

    // Send to server to get a nonce
    const response = await fetch("/api/auth/nonce", {
      method: "POST",
      headers: { "Content-Type": "application/json" },
      body: JSON.stringify({ address: userAddress }),
    });

    const { nonce } = await response.json();
    console.log("Received nonce:", nonce);
  }

  return (
    <div>
      <CardanoWallet />
      {connected && (
        <button onClick={startLogin}>Sign In</button>
      )}
    </div>
  );
}
What to expect: The wallet connects and sends the address to your server.
Step 2: Generate a nonce on the server
Create an API route that generates and stores nonces:
// app/api/auth/nonce/route.ts
import { NextResponse } from "next/server";
import { generateNonce } from "@meshsdk/core";

// In production, use a database
const nonceStore = new Map<string, { nonce: string; expires: number }>();

export async function POST(request: Request) {
  const { address } = await request.json();

  // Generate a nonce with a custom message prefix
  const nonce = generateNonce("Sign this message to authenticate with MyApp: ");

  // Store with 5-minute expiration
  nonceStore.set(address, {
    nonce,
    expires: Date.now() + 5 * 60 * 1000,
  });

  return NextResponse.json({ nonce });
}

// Export for use in verification
export { nonceStore };
What to expect: A unique nonce is generated and stored for each address.
Step 3: Sign the nonce with the wallet
Update the client to sign the nonce:
// components/SignIn.tsx
"use client";

import { useState } from "react";
import { CardanoWallet, useWallet } from "@meshsdk/react";

export function SignIn() {
  const { wallet, connected } = useWallet();
  const [status, setStatus] = useState<"idle" | "signing" | "verifying" | "authenticated">("idle");

  async function handleSignIn() {
    if (!connected) return;

    try {
      setStatus("signing");

      // Get user address
      const userAddress = (await wallet.getUsedAddresses())[0];

      // Get nonce from server
      const nonceRes = await fetch("/api/auth/nonce", {
        method: "POST",
        headers: { "Content-Type": "application/json" },
        body: JSON.stringify({ address: userAddress }),
      });
      const { nonce } = await nonceRes.json();

      // Sign the nonce with the wallet
      const signature = await wallet.signData(nonce, userAddress);

      // Verify signature on server
      setStatus("verifying");
      const verifyRes = await fetch("/api/auth/verify", {
        method: "POST",
        headers: { "Content-Type": "application/json" },
        body: JSON.stringify({
          address: userAddress,
          signature,
        }),
      });

      const { success, token } = await verifyRes.json();

      if (success) {
        setStatus("authenticated");
        // Store token, update state, redirect, etc.
        console.log("Authenticated! Token:", token);
      } else {
        setStatus("idle");
        console.error("Authentication failed");
      }
    } catch (error) {
      console.error("Sign-in error:", error);
      setStatus("idle");
    }
  }

  return (
    <div className="space-y-4">
      <CardanoWallet
        label={status === "authenticated" ? "Connected" : "Sign In with Cardano"}
        onConnected={handleSignIn}
      />

      {status === "signing" && <p>Please sign the message in your wallet...</p>}
      {status === "verifying" && <p>Verifying signature...</p>}
      {status === "authenticated" && <p>Welcome! You are authenticated.</p>}
    </div>
  );
}
What to expect: The wallet prompts the user to sign a message.
Step 4: Verify the signature on the server
Create an API route that verifies signatures:
// app/api/auth/verify/route.ts
import { NextResponse } from "next/server";
import { checkSignature } from "@meshsdk/core";
import { nonceStore } from "../nonce/route";

export async function POST(request: Request) {
  const { address, signature } = await request.json();

  // Retrieve stored nonce
  const stored = nonceStore.get(address);

  if (!stored) {
    return NextResponse.json(
      { success: false, error: "No nonce found for address" },
      { status: 400 }
    );
  }

  // Check expiration
  if (Date.now() > stored.expires) {
    nonceStore.delete(address);
    return NextResponse.json(
      { success: false, error: "Nonce expired" },
      { status: 400 }
    );
  }

  // Verify the signature
  const isValid = checkSignature(stored.nonce, signature, address);

  // Always invalidate nonce after use (prevent replay)
  nonceStore.delete(address);

  if (!isValid) {
    return NextResponse.json(
      { success: false, error: "Invalid signature" },
      { status: 401 }
    );
  }

  // Create session token (use your preferred method)
  const token = createSessionToken(address);

  return NextResponse.json({ success: true, token });
}

function createSessionToken(address: string): string {
  // In production, use proper JWT signing
  return Buffer.from(JSON.stringify({
    address,
    iat: Date.now(),
    exp: Date.now() + 24 * 60 * 60 * 1000, // 24 hours
  })).toString("base64");
}
What to expect: The server verifies the signature and issues a session token.
Complete Example
Here is a complete implementation with all components:
components/AuthProvider.tsx:
"use client";

import { createContext, useContext, useState, ReactNode } from "react";
import { CardanoWallet, useWallet } from "@meshsdk/react";

interface AuthContextType {
  isAuthenticated: boolean;
  address: string | null;
  signIn: () => Promise<void>;
  signOut: () => void;
}

const AuthContext = createContext<AuthContextType | null>(null);

export function AuthProvider({ children }: { children: ReactNode }) {
  const { wallet, connected } = useWallet();
  const [isAuthenticated, setIsAuthenticated] = useState(false);
  const [address, setAddress] = useState<string | null>(null);

  async function signIn() {
    if (!connected) return;

    const userAddress = (await wallet.getUsedAddresses())[0];

    // Get nonce
    const nonceRes = await fetch("/api/auth/nonce", {
      method: "POST",
      headers: { "Content-Type": "application/json" },
      body: JSON.stringify({ address: userAddress }),
    });
    const { nonce } = await nonceRes.json();

    // Sign nonce
    const signature = await wallet.signData(nonce, userAddress);

    // Verify
    const verifyRes = await fetch("/api/auth/verify", {
      method: "POST",
      headers: { "Content-Type": "application/json" },
      body: JSON.stringify({ address: userAddress, signature }),
    });
    const { success } = await verifyRes.json();

    if (success) {
      setIsAuthenticated(true);
      setAddress(userAddress);
    }
  }

  function signOut() {
    setIsAuthenticated(false);
    setAddress(null);
  }

  return (
    <AuthContext.Provider value={{ isAuthenticated, address, signIn, signOut }}>
      {children}
    </AuthContext.Provider>
  );
}

export function useAuth() {
  const context = useContext(AuthContext);
  if (!context) throw new Error("useAuth must be used within AuthProvider");
  return context;
}
Usage in a page:
import { CardanoWallet, useWallet } from "@meshsdk/react";
import { useAuth } from "@/components/AuthProvider";

export default function ProtectedPage() {
  const { connected } = useWallet();
  const { isAuthenticated, address, signIn, signOut } = useAuth();

  if (!connected) {
    return <CardanoWallet label="Connect Wallet" />;
  }

  if (!isAuthenticated) {
    return (
      <button onClick={signIn}>
        Sign In with Cardano
      </button>
    );
  }

  return (
    <div>
      <p>Welcome, {address?.slice(0, 16)}...</p>
      <button onClick={signOut}>Sign Out</button>
      {/* Protected content here */}
    </div>
  );
}
Next Steps
- Production deployment - Security best practices
- BrowserWallet API - More wallet methods
- CIP-8 Specification - Message signing standard
Troubleshooting
Signature verification fails
Cause: The address used for signing does not match the one verified.
Solution: Ensure you use the same address for both operations:
// Use the same address for signing and verification
const address = (await wallet.getUsedAddresses())[0];
const signature = await wallet.signData(nonce, address);
// Send this exact address to the server
Nonce expired
Cause: User took too long to sign.
Solution: Increase the expiration time or implement retry logic:
// Increase to 10 minutes
expires: Date.now() + 10 * 60 * 1000,
User rejected signing
Cause: User clicked "Cancel" in the wallet popup.
Solution: Catch the error and allow retry:
try {
  const signature = await wallet.signData(nonce, address);
} catch (error) {
  if (error.message.includes("User rejected")) {
    // Show "Please sign to continue" message
  }
}
Invalid signature format
Cause: The signature object is not serialized correctly.
Solution: The signData method returns a signature object. Pass it directly to checkSignature:
// Client
const signature = await wallet.signData(nonce, address);
// signature is { signature: string, key: string }

// Server
checkSignature(nonce, signature, address);
// Not checkSignature(nonce, signature.signature, address)
Security Best Practices
- Always regenerate nonces - A used nonce must never be valid again
- Set short expiration - 5-10 minutes maximum for unused nonces
- Use HTTPS - Protect the signature during transmission
- Validate addresses - Check format before database operations
- Rate limit requests - Prevent brute force attempts
- Log authentication events - Monitor for suspicious activity
References
- CIP-8: Message Signing - The Cardano standard for signing and verifying arbitrary data with private keys
- CIP-30: dApp-Wallet Web Bridge - The standard enabling wallet connectivity in web applications
- Cardano Developer Portal - Official Cardano development resources
Related Links
Build Multi-Signature Minting Transactions
Implement multi-sig NFT minting with Mesh SDK. Coordinate signatures between browser and server wallets.
Build a Custom Blockchain Provider
Create custom providers to connect Mesh SDK to any data source. Implement IFetcher and ISubmitter interfaces for your own infrastructure.